
Today, Continuous Glucose Monitoring (CGM) technology has brought a genuine revolution to the lives of people living with diabetes. And one of the most recognized names driving that revolution is Abbott's FreeStyle Libre system. If you are approaching this device for the first time, the very first question that comes to mind is usually: "What do I actually get? Where do I even start?" That is exactly what this article is here to answer.
What Is the FreeStyle Libre 3 Plus Starter Kit?
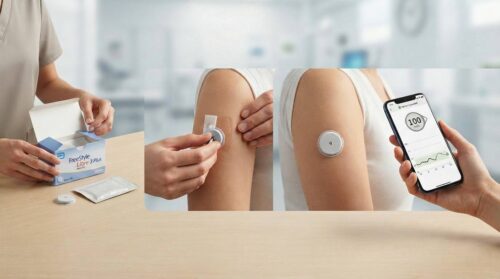
When you purchase the freestyle libre 3 plus system for the first time, you receive a complete starter package designed to make the beginning of your CGM journey as smooth as possible. This is not a single item it is an entire system bundled together so that everything you need to begin monitoring your glucose is right there in one place.
The FreeStyle Libre 3 Plus Starter Kit typically includes:
- FreeStyle Libre 3 Plus Sensor(s) the small adhesive patch worn on the back of the upper arm
- Sensor Applicator the device that applies the sensor to the skin quickly and without pain
- Quick Start Guide clear, easy-to-follow instructions for first-time setup
- FreeStyle Libre 3 Reader (included in some kits, optional in others) for those who prefer not to use a smartphone
- App Setup Instructions guidance on how to download and configure the Libre 3 Plus App on your phone
In some regions, the starter kit includes more than one sensor so that the first month of monitoring is covered in a single purchase. The exact contents can vary depending on your country and where you buy it confirm with your pharmacist or healthcare provider before purchasing.
The Star of the Kit: The FreeStyle Libre 3 Plus Sensor
The heart of the entire FreeStyle Libre 3 Plus system is the FreeStyle Libre 3 Plus sensor. It is a small, round adhesive patch roughly the size of a small coin that sits on the back of your upper arm and stays there for up to 15 days at a stretch.
Inside the sensor is an extremely fine filament a tiny wire that sits just beneath the surface of the skin and continuously measures glucose levels in the interstitial fluid. Those readings update automatically every 60 seconds, all day and all night, without you needing to do a single thing.
The sensor is designed to stay on through everything sleep, exercise, showering, and daily activities. Most people find that after the first day or two, they forget it is even there.
The FreeStyle Libre 3 Reader: Do You Actually Need It?
Some versions of the starter kit include the freestyle libre 3 reader but it is now an optional accessory rather than a necessity. This is one of the biggest practical upgrades that the Libre 3 Plus brought over earlier models.
The FreeStyle Libre 3 Plus connects directly to your smartphone via Bluetooth. Simply download the Libre 3 Plus App, pair your sensor, and your glucose data flows straight to your phone no separate reader device needed.
That said, the reader does still have its place. It is most useful when:
- You do not have a compatible smartphone
- You would rather not rely on your phone's battery for monitoring
- Your phone is unavailable or out of reach
Think of the reader as a reliable backup rather than the primary way to use the system. For most people, the phone alone handles everything perfectly well.
We are a licensed DME supplier. We verify your insurance before your first order, bill your insurer directly, and ship fast across the US.
How to Get Started: Step-by-Step Setup
Opening the FreeStyle Libre 3 Plus Starter Kit for the first time can feel a little overwhelming but the actual setup process is straightforward. Follow these steps and you will be up and running quickly.
If you are new to CGM technology or currently on insulin therapy, it is strongly recommended to have your doctor or a certified diabetes educator walk you through the first setup in person.
Tips for Applying the Sensor Correctly
Applying the Libre 3 sensor is simple but a few good habits make the experience noticeably better:
- Choose the Right Spot: The soft tissue on the back of the upper arm is the designated and recommended area. Avoid placing the sensor directly over bone or hard muscle, and stay away from the front of the arm where movement is greater.
- Make Sure the Skin Is Fully Dry: After using the alcohol swab, wait at least 30 seconds before applying the sensor. Even a small amount of residual moisture can cause the adhesive to fail early.
- Wear Loose-Fitting Sleeves: Tight clothing rubbing directly against the sensor over time can loosen the adhesive and cause it to peel away before the 15-day period is up.
- Avoid Scarred or Tattooed Skin: The sensor does not read as accurately through damaged or heavily pigmented skin. Always choose a smooth, healthy area for placement.
- Rotate Placement Locations: Each time you replace your sensor, shift the placement slightly to a different spot on the same arm or alternate arms to avoid skin irritation over time.
Sensor Replacement: When and How
Each Libre 3 sensor automatically expires after exactly 15 days the app will give you a heads-up alert before that happens so you are never caught off guard.
The sensor replacement process is simple enough to do entirely on your own at home:
- Gently peel the old sensor away from your skin. If the adhesive feels particularly strong, warm water or specialized adhesive remover wipes can help loosen it without irritating the skin.
- Clean and dry a slightly different spot on your arm, then apply the new sensor using the same steps as the first time.
- Open the FreeStyle Libre 3 app, start a new sensor, and pair it the process is identical to the initial setup.
Life After the Starter Kit: Ongoing Supplies
The starter kit is a one-time purchase but continuing to use the system means buying replacement sensors on a regular basis. Here are some practical things to know:
- Subscription Plans: Monthly delivery subscriptions are available through many pharmacies and authorized Abbott distributors, eliminating the need to manually reorder each time.
- Insurance and Coverage: Quite a number of health insurance plans offer coverage for the sensor with a valid prescription. Getting a CGM prescription is the recommended first step.
- Buying in Bulk: Purchasing a three or six-month supply at once often reduces the per-sensor cost compared to buying one at a time.
- Proper Storage: Unused sensors should be stored in a cool place, away from heat, cold, or direct sunlight. Poor storage conditions can impact sensor accuracy before use.
Dispatch My Meds offers monthly subscription delivery of Freestyle Libre 3 sensors. We verify your insurance, handle the paperwork, and ship across the US.
What exactly comes in the FreeStyle Libre 3 Plus Starter Kit?
Do I need the reader, or can I just use my phone?
How long does the starter kit last?
Do I need a prescription to buy the FreeStyle Libre 3 Plus Starter Kit?
How long does the entire setup take?
Can I wear the sensor during exercise and swimming?
Should I be concerned about FreeStyle Libre 3 recall information?
This article is for informational and educational purposes only. It is not intended to serve as medical advice, diagnosis, or treatment. Always consult your physician, endocrinologist, or qualified healthcare professional before making any changes to your diabetes management plan, medication, or device use. Dispatch My Meds is a licensed medical supply company, not a medical practice. Individual insurance coverage and medical needs vary please confirm coverage details with your insurance provider and care team.